원거리 무기 구현
스캐너
- 스캐너를 만들어서 Enemy가 접근하고있는지 확인합니다.
- 접근중인 Enemy중에 가장 가까운 적에게 우선적으로 공격하기위해 Scanner 스크립트를 작성합니다.
- 먼저 Enemy 프리팹의 Layer를 Enemy로 바꿔줍니다.(Add Layer하여 생성)
Scanner.cs
using System.Collections;
using System.Collections.Generic;
using UnityEngine;

public class Scanner : MonoBehaviour
{
    public float scanRange;         // ... 스캔할 범위
    public LayerMask targetLayer;   // ... 레이어를 담을 변수
    public RaycastHit2D[] targets;  // ... 스캔 결과
    public Transform nearsetTarget; // ... 가장 가까운 타겟

    void FixedUpdate()
    {
        // 원형의 캐스트를 쏘고 모든 결과 반환
        // ... (캐스팅시작위치, 원의반지름, 캐스팅방향, 캐스팅길이, 대상레이어)
        targets = Physics2D.CircleCastAll(transform.position, scanRange, Vector2.zero, 0, targetLayer);
        nearsetTarget = GetNearest();
    }

    // ... 가장 가까운 적찾기
    Transform GetNearest()
    {
        Transform result = null;
        float diff = 100;

        // ... 스캔결과를 돌면서 가장 가까운 타겟을 계속해서 업데이트
        foreach(RaycastHit2D target in targets)
        {
            Vector3 myPos = transform.position;             // ... 플레이어 위치
            Vector3 targetPos = target.transform.position;  // ... 타겟의 위치

            float curDiff = Vector3.Distance(myPos, targetPos); // ... 거리차이

            if (curDiff < diff)
            {
                diff = curDiff;
                result = target.transform;
            }
        }

        return result;
    }
}
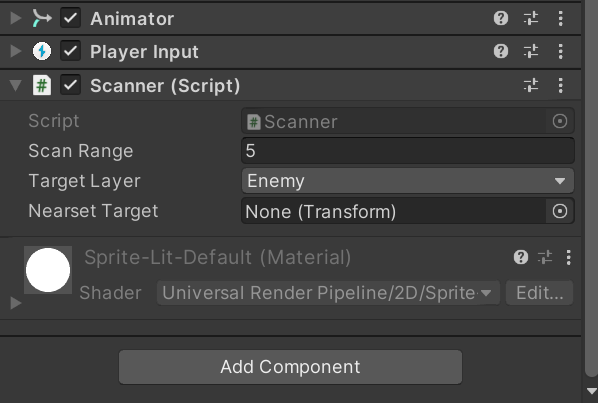
- Scanner 스크립트를 플레이어 오브젝트에 붙여줍니다.
- Scanner 부분의 targetLayer와 scanRange를 설정해주고 게임을 실행해봅니다.
- nearestTarget이 플레이어와 가장 가까운 Enemy로 설정되는것을 볼 수 있습니다.
새로운 무기 추가
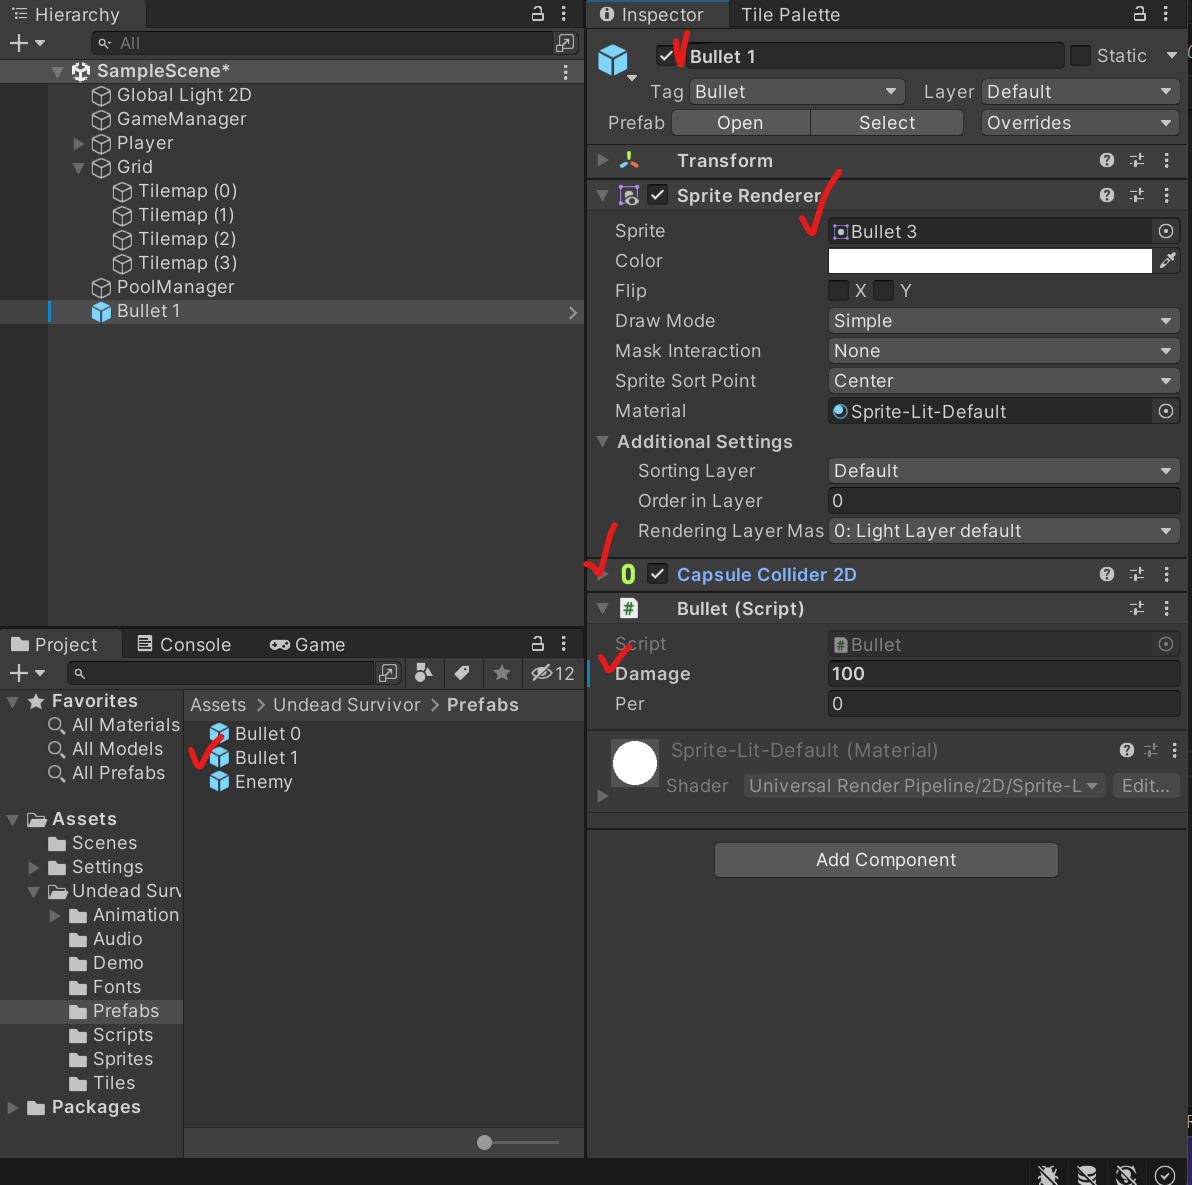
- 기존에 있던 프리팹 Bullet 0을 장면에 놓습니다.
- 프로젝트의 Sprites - Props - Bullet3 를 Bullet 0의 SpriteRenderer의 Sprite에 드래그드랍합니다.
- 이름도 새로운 무기니까 Bullet1로 해줍니다.
- Scene에서 한번 보면, BoxCollider가 오브젝트 사이즈에 맞지않을 수 있는데, BoxCollider 컴포넌트를 삭제하거나 사이즈를 맞춰줍니다.
- 그런다음 Bullet1를 프리팹 폴더에 갖다 놓습니다. 이렇게하면 쉽게 기존의것을 재사용하여 무기를 만들수있습니다.
총탄 생성하기
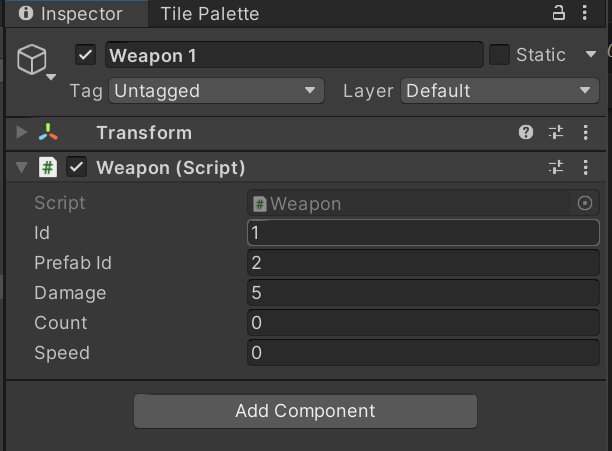
- 플레이어 자식 오브젝트로 있는 Weapon0을 Ctrl+D 하여 복사한뒤 이름을 Weapon1로 바꿔줍니다.
- Weapon 스크립트의 속성을 바꿔줍니다.
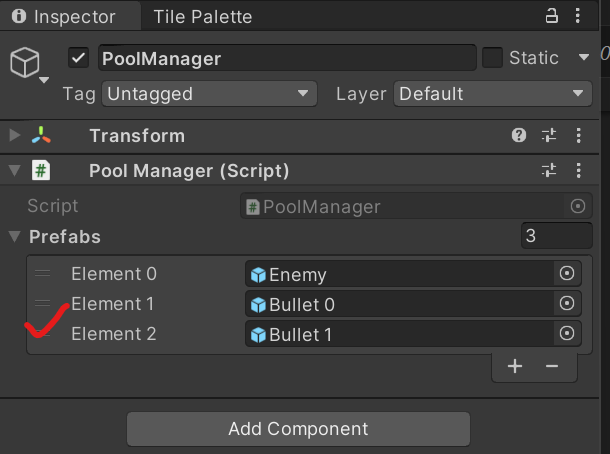
- PoolManager에서 Element를 추가하여 Bullet1를 추가합니다.
Weapon.cs 수정
using System.Collections;
using System.Collections.Generic;
using UnityEngine;

public class Weapon : MonoBehaviour
{
    public int id;              // ... 무기 id
    public int prefabId;        // ... 프리팹 id
    public float damage;        // ... 무기데미지
    public int count;           // ... 개수
    public float speed;         // ... 속도

    float timer;                // ... 공격 주기를 위한 타이머
    Player player;              // ... 플레이어 스크립트

    void Awake()
    {
        player = GetComponentInParent<Player>();
    }

    void Start()
    {
        Init();
    }

    void Update()
    {
        switch (id)
        {
            case 0:
                // ... Bullet 0 회전 로직
                transform.Rotate(Vector3.back * speed * Time.deltaTime);
                break;
            default:
                timer += Time.deltaTime;

                if (timer > speed)
                {
                    timer = 0f;
                    Fire();
                }
                break;
        }

        // ... 레벨업 테스트
        if (Input.GetButtonDown("Jump"))
        {
            LevelUp(20, 5);
        }
    }

    // ... 레벨업 함수
    public void LevelUp(float damage, int count)
    {
        this.damage = damage;
        this.count += count;

        if (id == 0)        // .. 근접무기
            Batch();
    }

    public void Init()
    {
        switch (id)
        {
            case 0:
                speed = 150;
                Batch();
                break;
            default:
                speed = 0.3f;
                break;
        }
    }

    // ... Bullet 0 무기 배치 함수
    void Batch()
    {
        for(int index=0; index < count; index++)
        {
            // ... 불릿의 위치정보
            Transform bullet;

            if (index < transform.childCount)
            {
                bullet = transform.GetChild(index);
            }
            else
            {
                bullet = GameManager.instance.pool.Get(prefabId).transform;
                // ... 부모를 자식으로
                bullet.parent = transform;
            }

            bullet.localPosition = Vector3.zero;
            bullet.localRotation = Quaternion.identity;

            Vector3 rotVec = Vector3.forward * 360 * index / count;     // ... 무기 위치
            bullet.Rotate(rotVec);
            bullet.Translate(bullet.up * 1.5f, Space.World);    // ... 무기 배치
            bullet.GetComponent<Bullet>().Init(damage, -1);     // ... -1 값은 무한 관통
        }
    }

    // ... Bullet 1
    void Fire()
    {
        // ... 대상이 없다면
        if (!player.scanner.nearsetTarget)
            return;

        Transform bullet = GameManager.instance.pool.Get(prefabId).transform;
        bullet.position = transform.position;
    }
}
- Player 스크립트에 접근하기위해 player 변수를 초기화해주었습니다.
- Player 스크립트에 접근하기 위해서는 Player 스크립트에서도 변수를 초기화해주어야합니다.
    public Scanner scanner;

    void Awake(){
        scanner = GetComPonent<Scanner>();
    }
- Bullet 1은 speed가 timer보다 작을 때 Fire() 함수를 호출하여 발사되도록합니다.
총탄 발사
- Bullet 1 프리팹을 더블클릭해서 RigidBody2D 컴포넌트를 추가합니다. 중력의 영향을 받으면 안되는 GravityScale은 0으로설정합니다.
Bullet.cs 수정
using System.Collections;
using System.Collections.Generic;
using UnityEngine;

public class Bullet : MonoBehaviour
{

    public float damage;        // ... 총알 데미지
    public int per;             // ... 관통

    Rigidbody2D rigid;

    void Awake()
    {
        rigid = GetComponent<Rigidbody2D>();
    }

    // ... 변수 초기화
    public void Init(float damage, int per, Vector3 dir)
    {
        this.damage = damage;       // ... 왼쪽의 damge는 Bullet 클래스의 damage, 오른쪽은 매개변수의 damage
        this.per = per;

        // ... 관통이 무한보다 큰것(원거리무기)
        if(per > -1)
        {
            rigid.velocity = dir * 15f;
        }
    }

    void OnTriggerEnter2D(Collider2D collision)
    {
        if (!collision.CompareTag("Enemy") || per == -1)
            return;

        per--;

        // ... 불릿이 힘을 다했을 때
        if(per == -1)
        {
            rigid.velocity = Vector2.zero;
            gameObject.SetActive(false);
        }
    }
}
- RigidBody2D 컴포넌트를 추가했기때문에 초기화해줍니다.
- Init 함수의 매개변수를 추가합니다. dir 라는 방향을 받습니다.
- 관통력(per)이 -1보다 클 때(근접무기가 아닐 때) 발사체 속도를 지정했습니다.
- OntriggerEnter2D에서는 발사된 불릿이 몬스터와 닿게되면 관통력(per)이 줄어들게되고, 관통력이 떨어지면 비활성화 시켜줍니다.
- 이때 재사용하기위해서 미리 속도를 0으로 초기화 해놓습니다.
Weapon.cs 수정
using System.Collections;
using System.Collections.Generic;
using UnityEngine;

public class Weapon : MonoBehaviour
{
    public int id;              // ... 무기 id
    public int prefabId;        // ... 프리팹 id
    public float damage;        // ... 무기데미지
    public int count;           // ... 개수
    public float speed;         // ... 속도

    float timer;                // ... 공격 주기를 위한 타이머
    Player player;              // ... 플레이어 스크립트

    void Awake()
    {
        player = GetComponentInParent<Player>();
    }

    void Start()
    {
        Init();
    }

    void Update()
    {
        switch (id)
        {
            case 0:
                // ... Bullet 0 회전 로직
                transform.Rotate(Vector3.back * speed * Time.deltaTime);
                break;
            default:
                timer += Time.deltaTime;

                if (timer > speed)
                {
                    timer = 0f;
                    Fire();
                }
                break;
        }

        // ... 레벨업 테스트
        if (Input.GetButtonDown("Jump"))
        {
            LevelUp(10, 1);
        }
    }

    // ... 레벨업 함수
    public void LevelUp(float damage, int count)
    {
        this.damage = damage;
        this.count += count;

        if (id == 0)        // .. 근접무기
            Batch();
    }

    public void Init()
    {
        switch (id)
        {
            case 0:
                speed = 150;
                Batch();
                break;
            default:
                speed = 0.3f;
                break;
        }
    }

    // ... Bullet 0 무기 배치 함수
    void Batch()
    {
        for(int index=0; index < count; index++)
        {
            // ... 불릿의 위치정보
            Transform bullet;

            if (index < transform.childCount)
            {
                bullet = transform.GetChild(index);
            }
            else
            {
                bullet = GameManager.instance.pool.Get(prefabId).transform;
                // ... 부모를 자식으로
                bullet.parent = transform;
            }

            bullet.localPosition = Vector3.zero;
            bullet.localRotation = Quaternion.identity;

            Vector3 rotVec = Vector3.forward * 360 * index / count;     // ... 무기 위치
            bullet.Rotate(rotVec);
            bullet.Translate(bullet.up * 1.5f, Space.World);    // ... 무기 배치
            bullet.GetComponent<Bullet>().Init(damage, -1, Vector3.zero);     // ... -1 값은 무한 관통
        }
    }

    // ... Bullet 1
    void Fire()
    {
        // ... 대상이 없다면
        if (!player.scanner.nearsetTarget)
            return;

        // ... 총알이 나가고자 하는 방향 설정
        Vector3 targetPos = player.scanner.nearsetTarget.position;
        Vector3 dir = targetPos - transform.position;       // ... 크기가 포함된 방향
        dir = dir.normalized;

        Transform bullet = GameManager.instance.pool.Get(prefabId).transform;
        // ... 위치와 회전 결정
        bullet.position = transform.position;
        // ... 지정된 축을 중심으로 목표를 향해 회전
        bullet.rotation = Quaternion.FromToRotation(Vector3.up, dir);
        // ... count는 관통력
        bullet.GetComponent<Bullet>().Init(damage, count , dir);
    }
}
- bullet 1의 방향, 위치와 회전과 초기화를 해주었습니다.
- 아까 Bullet함수의 Init함수의 매개변수를 추가했기때문에 Batch 함수의 마지막부분Init의 3번쨰 매개변수를 임의로 0을 주었습니다.
- 마지막으로 레벨업을 조금 수정해서 레벨업했을 때 관통력과 데미지가 상승하는지 테스트 해보았습니다.
테스트
댓글남기기