[Unity] 슈퍼마리오 게임 만들기[11]
사운드 넣기
-
이제 게임이 거의 완성되어 갑니다.
-
게임에서 필수요소중 하나인 게임 사운드를 넣어서 게임이 더 생동감있도록 해보겠습니다.
음원준비
-
저는 구글링을 통해 무료로 슈퍼마리오 효과음/배경음을 다운받아 준비했습니다.
-
점프, 공격, 피격, 코인먹는 소리, 죽는소리 등을 준비했습니다.
구현
구현방법은 간단합니다. 점프, 공격, 피격, 죽는소리는 플레이어의 소리이므로 Hirerarchy 뷰의 Player를 선택한 뒤,
Add Component - AudioSource 를 추가합니다.
코인먹는 소리는 Coin에 추가합니다.
PlayerControl.cs
using System.Collections;
using System.Collections.Generic;
using UnityEngine;

public class PlayerControl : MonoBehaviour
{
    Rigidbody2D rigid;
    SpriteRenderer spriteRenderer;
    Animator anim;
    CapsuleCollider2D Player_collider;
    AudioSource audioSource;

    public GameManager gameManager;
    public float maxSpeed;
    public float jumpPower;

    public AudioClip audioJump;
    public AudioClip audioDie;
    public AudioClip audioAttack;
    public AudioClip audioDamaged;

    private void Awake()
    {
        rigid = GetComponent<Rigidbody2D>();
        spriteRenderer = GetComponent<SpriteRenderer>();
        anim = GetComponent<Animator>();
        Player_collider = GetComponent<CapsuleCollider2D>();
        audioSource = GetComponent<AudioSource>();
    }
    // Start is called before the first frame update
    void Start()
    {

    }

    void Update()
    {
        //키보드 뗏을때 속도감소(멈춤)
        if (Input.GetButtonUp("Horizontal"))
        {
            //normalized : 단위벡터화
            rigid.velocity = new Vector2(0.5f * rigid.velocity.normalized.x, rigid.velocity.y);

        }

        //플레이어 방향 전환
        if (Input.GetButton("Horizontal"))
            spriteRenderer.flipX = Input.GetAxisRaw("Horizontal") == -1;

        //Walking Animation 설정
        if (Mathf.Abs(rigid.velocity.x) < 0.3f)
            anim.SetBool("isWalking", false);
        else
            anim.SetBool("isWalking", true);

        //점프(1단점프만 가능)
        if (Input.GetButtonDown("Jump") && !anim.GetBool("isJumping"))
        {
            rigid.AddForce(Vector2.up * jumpPower, ForceMode2D.Impulse);
            anim.SetBool("isJumping", true);
            PlaySound("JUMP");
        }
    }

    void FixedUpdate()
    {
        //키보드 방향키 입력으로 움직임
        float h = Input.GetAxisRaw("Horizontal");

        rigid.AddForce(Vector2.right * h, ForceMode2D.Impulse);

        if (rigid.velocity.x > maxSpeed) //오른쪽 속도
            rigid.velocity = new Vector2(maxSpeed, rigid.velocity.y);
        else if (rigid.velocity.x < maxSpeed * (-1))  //왼쪽 속도
            rigid.velocity = new Vector2(maxSpeed * (-1), rigid.velocity.y);

        //착지(캐릭터가 떨어지고있을 때)
        if (rigid.velocity.y < 0)
        {
            Debug.DrawRay(rigid.position, Vector3.down, new Color(1, 0, 0));
            RaycastHit2D rayHit = Physics2D.Raycast(rigid.position, Vector3.down, 1, LayerMask.GetMask("Floor"));
            if (rayHit.collider != null)
            {
                if (rayHit.distance <= 0.5f)
                    anim.SetBool("isJumping", false);
            }
        }
    }

    // 충돌 이벤트
    void OnCollisionEnter2D(Collision2D collision)
    {
        if(collision.gameObject.tag == "Monster")
        {
            //공격
            if (rigid.velocity.y < 0 && transform.position.y > collision.transform.position.y)
            {
                Attack(collision.transform);
                PlaySound("ATTACK");
            }
            else
            {
                OnDamaged(collision.transform.position);
                PlaySound("DAMAGED");
            }
        }
    }

    //몬스터 밟기
    void Attack(Transform monster)
    {
        //Get Point
        gameManager.totalPoint += 500;

        //캐릭터 반동효과
        rigid.AddForce(Vector2.up * 10, ForceMode2D.Impulse);

        //몬스터의 스크립트를 참조
        MonsterController monsterMove = monster.GetComponent<MonsterController>();
        monsterMove.OnDamaged();
    }

    // 피격됐을 때 호출되는 함수 [무적만들기] (피격된 대상의 위치를 받음)
    void OnDamaged(Vector2 targetPos)
    {
        // HP 깎임
        gameManager.HpDown();

        // PlayerDamaged 레이어로 변경
        gameObject.layer = 8;

        // 반투명도 설정(맞았다는것을 표현)
        spriteRenderer.color = new Color(1, 1, 1, 0.4f);

        //맞았을 때 팅겨남
        int dirc = transform.position.x - targetPos.x > 0 ? 1 : -1;
        rigid.AddForce(new Vector2(dirc, 1) * 7, ForceMode2D.Impulse);

        //피격 애니메이션
        anim.SetTrigger("Damaged");

        //무적풀림
        Invoke("OffDamaged", 2);
    }

    // 무적판정 풀기
    void OffDamaged()
    {
        gameObject.layer = 7;
        spriteRenderer.color = new Color(1, 1, 1, 1.0f);

    }

    // 충돌 이벤트
    private void OnTriggerEnter2D(Collider2D collision)
    {
       if(collision.gameObject.tag == "Finish")
        {
            // Go Next Stage
            gameManager.NextStage();
        }
    }

    //플레이어 죽음함수
    public void Die()
    {
        // 반투명도
        spriteRenderer.color = new Color(1, 1, 1, 0.4f);

        // 플레이어가 죽었음을 표현
        spriteRenderer.flipY = true;
        rigid.AddForce(Vector2.up * 15.0f, ForceMode2D.Impulse);

        Player_collider.enabled = false;

    }

    public void VelocityZero()
    {
        rigid.velocity = Vector2.zero;
    }

    // 효과음 재생
    void PlaySound(string action)
    {
        switch (action)
        {
            case "JUMP":
                audioSource.clip = audioJump;
                break;
            case "DIE":
                audioSource.clip = audioDie;
                break;
            case "ATTACK":
                audioSource.clip = audioAttack;
                break;
            case "DAMAGED":
                audioSource.clip = audioDamaged;
                break;
        }
        audioSource.Play();
    }
}
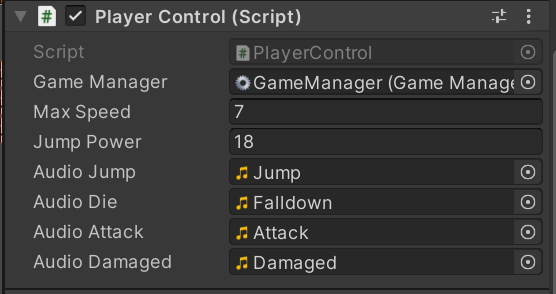
- 그다음 Player를 선택한 뒤 Inspector창에서 각 음원을 넣어줍니다.

Coin.cs
using System.Collections;
using System.Collections.Generic;
using UnityEngine;

public class Coin : MonoBehaviour
{
    public GameManager gameManager;
    public PlayerControl playerControl;

    public AudioClip audioCoin;

    AudioSource audioSource;

    private void Awake()
    {
        audioSource = GetComponent<AudioSource>();
    }

    public void OnTriggerEnter2D(Collider2D collision)
    {
        if (collision.gameObject.tag == "Player")
        {
            PlaySound();

            //Get Point(Bronze Silver Gold)
            bool isBreonze = gameObject.name.Contains("Bronze");
            bool isSilver = gameObject.name.Contains("Silver");
            bool isGold = gameObject.name.Contains("Gold");

            if (isBreonze)
                gameManager.totalPoint += 100;
            else if (isSilver)
                gameManager.totalPoint += 200;
            else if (isGold)
                gameManager.totalPoint += 300;


            Invoke("DestroyObject", 0.3f);

        }
    }

    void DestroyObject()
    {
        gameObject.SetActive(false);

    }
    void PlaySound()
    {
        //Sound
        audioSource.clip = audioCoin;
        audioSource.Play();
    }
}
- Invoke를 사용해서 오브젝트를 SetActive(false) 를 한 이유는, 사운드가 다 플레이되기전에 오브젝트가 사라지게되면 사운드가 전부 재생되지 않기 때문입니다.
메인카메라
-
메인카메라에는 배경음악을 넣어줍니다.
-
AudioSource를 추가한 뒤, Inspector의 AudioClip 부분에 배경음을 넣어줍니다
-
그리고 PlayOnAwake - 체크, Loop - 체크 해줍니다.
-
Play On Awake는 게임이 시작될 때 오디오가 실행된다는 것이고 Loop 는 반복해서 재생한다는 뜻입니다.

댓글남기기