[Android] 나만의 다이어리 앱 만들기 프로젝트3
이번 포스팅에서는 저번포스팅에서 설계했던 화면들에 대한 디자인을 하려고 합니다.
** 코드를 그대로 붙여넣기 했을 때 아무것도 보이지 않는 것은 이미지 파일이 없기 때문입니다. 저는 구글에서 찾은 무료이미지들을 res/drawble 폴더에 넣어놨습니다. 제 코드상의 이미지파일명과 동일하게 저장하시면 됩니다. **
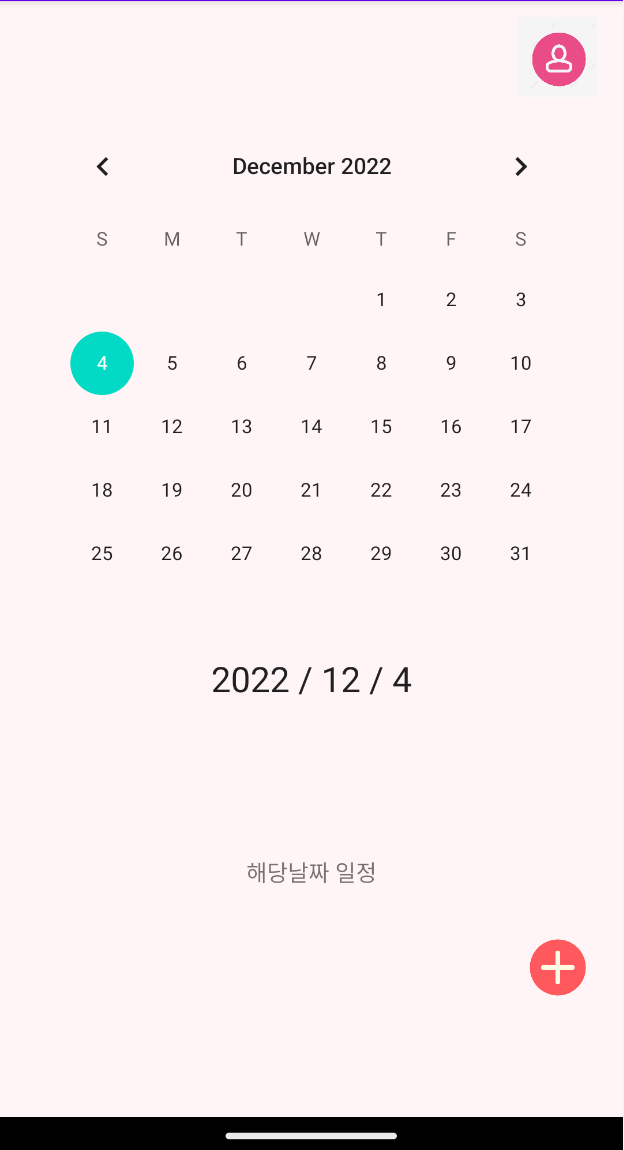
메인화면
메인화면은 앱을 실행했을 때 가장 먼저 보이는 화면입니다.
저는 메인화면에 달력을 표시하고, 상단에는 연락처로 갈 수 있는 버튼과 하단에는 일정을 추가할 수 있는 버튼을 만들려고 합니다.
메인화면코드(activity_main.xml)
<?xml version="1.0" encoding="utf-8"?>
<androidx.constraintlayout.widget.ConstraintLayout xmlns:android="http://schemas.android.com/apk/res/android"
	xmlns:app="http://schemas.android.com/apk/res-auto"
	android:layout_width="match_parent"
	android:layout_height="match_parent"
	android:background="#fff5f6">


	<androidx.constraintlayout.widget.ConstraintLayout
		android:id="@+id/linearLayout"
		android:layout_width="match_parent"
		android:layout_height="70dp"
		app:layout_constraintEnd_toEndOf="parent"
		app:layout_constraintStart_toStartOf="parent"
		app:layout_constraintTop_toTopOf="parent">

		<ImageButton
			android:id="@+id/button_GotoAddList"
			android:layout_width="50dp"
			android:layout_height="50dp"
			android:layout_marginEnd="16dp"
			android:background="#fff5f6"
			android:scaleType="fitXY"
			android:src="@drawable/imagephone"
			app:layout_constraintBottom_toBottomOf="parent"
			app:layout_constraintEnd_toEndOf="parent"
			app:layout_constraintTop_toTopOf="parent" />
	</androidx.constraintlayout.widget.ConstraintLayout>

	<CalendarView
		android:id="@+id/calendarView"
		android:layout_width="wrap_content"
		android:layout_height="wrap_content"
		app:layout_constraintEnd_toEndOf="parent"
		app:layout_constraintStart_toStartOf="parent"
		app:layout_constraintTop_toBottomOf="@+id/linearLayout" />

	<TextView
		android:id="@+id/DateView"
		android:layout_width="357dp"
		android:layout_height="37dp"
		android:gravity="center"
		android:text="DateView"
		android:textAppearance="@style/TextAppearance.AppCompat.Large"
		android:visibility="invisible"
		app:layout_constraintEnd_toEndOf="parent"
		app:layout_constraintStart_toStartOf="parent"
		app:layout_constraintTop_toBottomOf="@+id/calendarView" />

	<TextView
		android:id="@+id/diaryText"
		android:layout_width="match_parent"
		android:layout_height="207dp"
		android:gravity="center"
		android:visibility="invisible"
		app:layout_constraintEnd_toEndOf="parent"
		app:layout_constraintStart_toStartOf="parent"
		app:layout_constraintTop_toBottomOf="@+id/DateView" />

	<ImageButton
		android:id="@+id/button_GotoDiary"
		android:layout_width="50dp"
		android:layout_height="50dp"
		android:layout_marginEnd="16dp"
		android:background="#fff5f6"
		android:scaleType="fitXY"
		android:src="@drawable/addbutton"
		android:visibility="invisible"
		app:layout_constraintBottom_toBottomOf="@+id/diaryText"
		app:layout_constraintEnd_toEndOf="parent"
		app:layout_constraintTop_toBottomOf="@+id/DateView"
		app:layout_constraintVertical_bias="0.885" />

</androidx.constraintlayout.widget.ConstraintLayout>
저는 배치를 자유롭게 하기 위해 constraint layout을 사용하는 것을 추천드립니다. 화면 상단에 버튼을 추가하기위해 linear layout을 하나 사용했습니다만, 굳이 사용할 필요는 없습니다.
달력을 넣기위해 CalendarView를 추가했고, 달력에서 날짜를 선택했을 때 보여질 텍스트뷰와 버튼은 visibility 속성에서 invisible로 설정하여 날짜를 선택하기 전 까지는 보이지 않도록 했습니다.
메인화면 디자인
일정메인화면
일정메인화면은 메인화면에서 일정추가 버튼을 눌렀을 때 이동하는 화면입니다. 여기서는 썼던 일정 글들을 조회, 검색할 수 있고 글 쓰기 버튼을 통해 일정(글)을 쓸 수 있습니다.
일정메인화면코드(activity_diary_main.xml)
<?xml version="1.0" encoding="utf-8"?>
<androidx.constraintlayout.widget.ConstraintLayout xmlns:android="http://schemas.android.com/apk/res/android"
    xmlns:app="http://schemas.android.com/apk/res-auto"
    android:layout_width="match_parent"
    android:layout_height="match_parent"
    android:background="#fff5f6">

    <androidx.constraintlayout.widget.ConstraintLayout
        android:id="@+id/linearLayout"
        android:layout_width="match_parent"
        android:layout_height="70dp"
        app:layout_constraintEnd_toEndOf="parent"
        app:layout_constraintStart_toStartOf="parent"
        app:layout_constraintTop_toTopOf="parent">

        <ImageButton
            android:id="@+id/button_home"
            android:layout_width="50dp"
            android:layout_height="50dp"
            android:layout_marginStart="8dp"
            android:background="#fff5f6"
            android:scaleType="fitXY"
            android:src="@drawable/imagehome"
            app:layout_constraintBottom_toBottomOf="parent"
            app:layout_constraintStart_toStartOf="parent"
            app:layout_constraintTop_toTopOf="parent" />

        <Button
            android:id="@+id/button_GotoAddList"
            android:layout_width="wrap_content"
            android:layout_height="wrap_content"
            android:layout_marginEnd="16dp"
            android:text="글쓰기"
            app:layout_constraintBottom_toBottomOf="parent"
            app:layout_constraintEnd_toEndOf="parent"
            app:layout_constraintTop_toTopOf="parent"
            app:layout_constraintVertical_bias="0.444" />

    </androidx.constraintlayout.widget.ConstraintLayout>

    <EditText
        android:id="@+id/inputTitle"
        android:layout_width="200dp"
        android:layout_height="50dp"
        android:layout_marginTop="10dp"
        android:hint="제목을 입력하세요."
        app:layout_constraintEnd_toEndOf="parent"
        app:layout_constraintHorizontal_bias="0.331"
        app:layout_constraintStart_toStartOf="parent"
        app:layout_constraintTop_toBottomOf="@+id/linearLayout" />

    <TextView
        android:id="@+id/search1"
        android:layout_width="70dp"
        android:layout_height="50dp"
        android:layout_marginTop="10dp"
        android:gravity="center"
        android:text="검색"
        android:textSize="13pt"
        app:layout_constraintEnd_toStartOf="@+id/inputTitle"
        app:layout_constraintHorizontal_bias="0.0"
        app:layout_constraintStart_toStartOf="parent"
        app:layout_constraintTop_toBottomOf="@+id/linearLayout" />

    <ListView
        android:id="@+id/lv_list"
        android:layout_width="409dp"
        android:layout_height="599dp"
        app:layout_constraintBottom_toBottomOf="parent"
        app:layout_constraintEnd_toEndOf="parent"
        app:layout_constraintStart_toStartOf="parent"
        app:layout_constraintTop_toBottomOf="@+id/inputTitle" />

</androidx.constraintlayout.widget.ConstraintLayout>
검색을 위한 EditText와 글 리스트를 보여줄 ListView가 있는것을 보실 수 있습니다.
일정메인화면 디자인
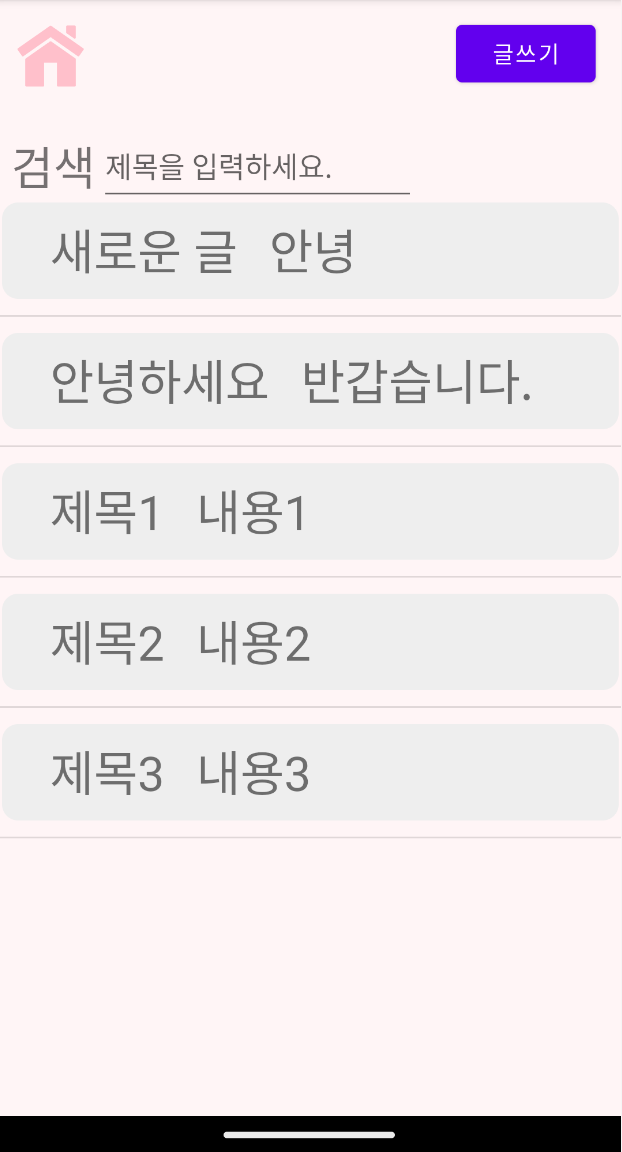 (글 리스트는 안보이는게 정상입니다. 저는 임시 데이터를 넣어놨기 때문에 보입니다.)
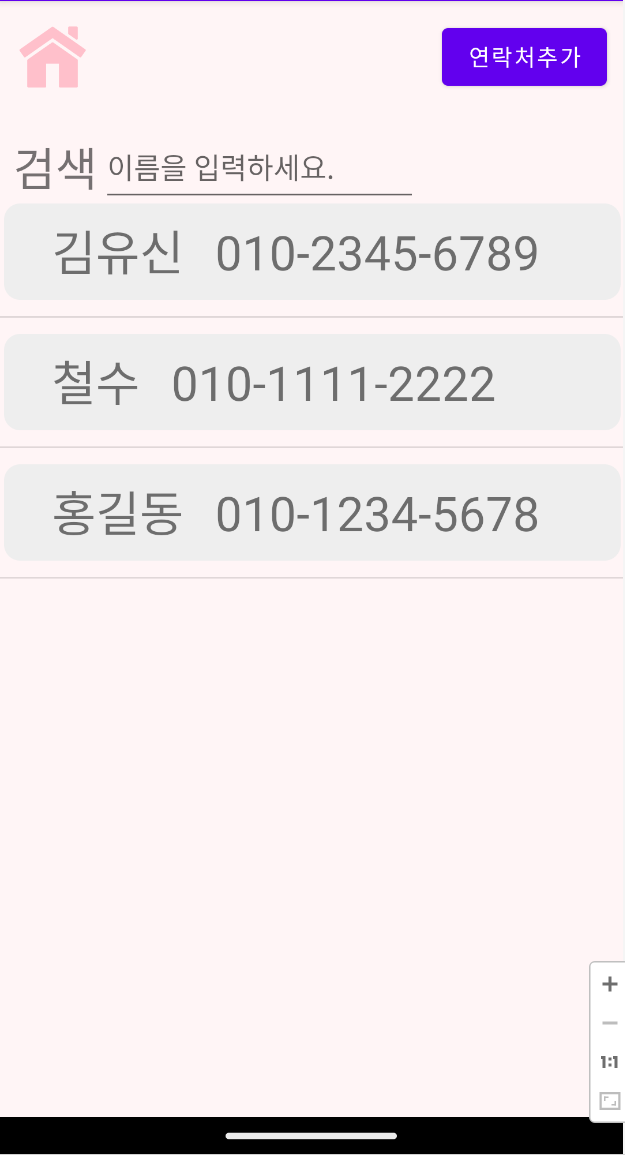
연락처메인화면
연락처메인화면은 메인화면에서 연락처 버튼을 눌렀을 때 이동하는 화면입니다.
일정메인화면과 동일한 디자인을 사용했습니다.
연락처메인화면코드(activity_phonebook_main.xml)
<?xml version="1.0" encoding="utf-8"?>
<androidx.constraintlayout.widget.ConstraintLayout xmlns:android="http://schemas.android.com/apk/res/android"
    xmlns:app="http://schemas.android.com/apk/res-auto"
    android:layout_width="match_parent"
    android:layout_height="match_parent"
    android:background="#fff5f6">

    <androidx.constraintlayout.widget.ConstraintLayout
        android:id="@+id/linearLayout"
        android:layout_width="match_parent"
        android:layout_height="70dp"
        app:layout_constraintEnd_toEndOf="parent"
        app:layout_constraintStart_toStartOf="parent"
        app:layout_constraintTop_toTopOf="parent">

        <ImageButton
            android:id="@+id/button_home"
            android:layout_width="50dp"
            android:layout_height="50dp"
            android:layout_marginStart="8dp"
            android:background="#fff5f6"
            android:scaleType="fitXY"
            android:src="@drawable/imagehome"
            app:layout_constraintBottom_toBottomOf="parent"
            app:layout_constraintStart_toStartOf="parent"
            app:layout_constraintTop_toTopOf="parent" />

        <Button
            android:id="@+id/button_GotoAddPhone"
            android:layout_width="wrap_content"
            android:layout_height="wrap_content"
            android:layout_marginEnd="10dp"
            android:text="연락처추가"
            app:layout_constraintBottom_toBottomOf="parent"
            app:layout_constraintEnd_toEndOf="parent"
            app:layout_constraintTop_toTopOf="parent" />

    </androidx.constraintlayout.widget.ConstraintLayout>

    <EditText
        android:id="@+id/inputtitle"
        android:layout_width="200dp"
        android:layout_height="50dp"
        android:layout_marginTop="10dp"
        android:hint="이름을 입력하세요."
        app:layout_constraintEnd_toEndOf="parent"
        app:layout_constraintHorizontal_bias="0.331"
        app:layout_constraintStart_toStartOf="parent"
        app:layout_constraintTop_toBottomOf="@+id/linearLayout" />

    <TextView
        android:id="@+id/search2"
        android:layout_width="70dp"
        android:layout_height="50dp"
        android:layout_marginTop="10dp"
        android:gravity="center"
        android:text="검색"
        android:textSize="13pt"
        app:layout_constraintEnd_toStartOf="@+id/inputtitle"
        app:layout_constraintHorizontal_bias="0.0"
        app:layout_constraintStart_toStartOf="parent"
        app:layout_constraintTop_toBottomOf="@+id/linearLayout" />

    <ListView
        android:id="@+id/lv_list1"
        android:layout_width="409dp"
        android:layout_height="599dp"
        app:layout_constraintBottom_toBottomOf="parent"
        app:layout_constraintEnd_toEndOf="parent"
        app:layout_constraintStart_toStartOf="parent"
        app:layout_constraintTop_toBottomOf="@+id/inputtitle" />

</androidx.constraintlayout.widget.ConstraintLayout>
연락처메인화면 디자인
포스팅이 길어지는 관계로 다음 포스팅에서 나머지 화면들을 구상해보도록 하겠습니다.
감사합니다.
댓글남기기